- Home
- Member Resources
- Councils and Committees
- Immunohistochemistry Topic Center
- Frequently Asked Questions from Immunohistochemistry Laboratories
Maintaining and expanding a test menu in immunohistochemistry can be complex. The following FAQs will address issues related to validation of tests that are new to a laboratory, as well as potential responses to test performance monitoring, especially in the setting of proficiency testing and/or other external quality assessment. Hypothetical examples of process improvement assessments are described, which are based on CAP proficiency testing participant queries and the experiences of CAP Immunohistochemistry Committee members.
- Open all
- Close all
The general concept of "validation" refers to measures taken by a laboratory to ensure that an assay performs as expected before putting it into clinical use. In practice, the term “validation” generally includes both “verification” and “validation” processes; however, in the context of immunohistochemistry, the semantic distinction between whether a laboratory is performing verification or validation has to do with whether the new test is FDA-cleared/approved for in-vitro diagnostics.1
A test modification includes use of the test on specimens other than those for which the assay was approved and specified by the manufacturer (eg, frozen sections, air-dried imprints, cytocentrifuge or other liquid-based preparations, decalcified tissues, and/or tissues fixed in non-formalin fixatives). Unmodified FDA-cleared/approved assays require verification. Laboratory-developed tests (non-FDA approved) and modified FDA-cleared/approved tests require validation. Pragmatically, the difference is the stringency of the documented evidence needed to support the use of a new test in a laboratory.
Validation refers to the process by which the entire assay is executed and confirmed to perform beyond a certain established degree of concordance compared to pre-determined acceptable results. Stated another way, validation is "confirmation, through the provision of objective evidence, that requirements for a specific intended use or application have been fulfilled (ISO 9000)." A laboratory must validate laboratory-developed immunohistochemical tests (LDTs) before placing them into use. A laboratory must re-validate tests if assay conditions change. Subsequent FAQs will address the nature and extent of the validation cohorts.
Verification refers to the process of ensuring the performance of FDA-cleared/approved assays. In theory, because significant work has already been done by the manufacturer to gain regulatory approval, verification could be less extensive. If the vendor provides specific instructions on assay verification in the kit instructions, following these is sufficient. However, in practice, many kit instructions only refer to the CAP Center Guideline on Analytic Validation of Immunohistochemical Assays, which does not specify the details of a less-stringent process for verification.1 Therefore, in the absence of specific guidance from manufacturers, and at the judgment of the laboratory/medical director, the process used for verification often adopts the available published requirements or best practice guidelines for validation of the analyte.
An important example at present is that for some analytes, such as HER2, additional guidance documents (eg, ASCO/CAP guidelines) may recommend or require more stringent evidence than CAP Center Guidelines as relates to testing in some tumor types.
References
- Goldsmith JD, Troxell ML, Roy-Chowdhuri S, et al. Principles of Analytic Validation of Immunohistochemical Assays. Guideline Update. Arch Pathol Lab Med. 2024; 148(6): e111-e153.
- Wolff AC, Somerfield MR, Dowsett M, et al. Human Epidermal Growth Factor Receptor 2 Testing in Breast Cancer: American Society of Clinical Oncology-College of American Pathologists Guideline Update. Arch Pathol Lab Med. 2023 June;147(9):993-1000.
Last updated: November 4, 2025
When testing volumes support the financial/clinical viability of offering a new test, and you have sufficient resources to supply the materials for validation/verification and the ongoing need for control tissues, the steps for validation/verification and maintenance are:
- Optimization:
- Select a commercially available clone. Clone-specific performance data from NordiQC assessments and/or CAP PT participant summary of response (PSR) can be a valuable tool in making the best selection.
- Identify an appropriate tissue for optimization (tissue with known expression of target antigen and a negative control).
- Follow the manufacturer-recommended protocol and review stain results.
- If needed, adjust conditions of the reaction (dilution, incubation, pretreatment parameters, etc) and review stain results iteratively until an optimal staining pattern is achieved.
- Note: Optimization is not necessary for FDA-cleared/approved reagents. They must be used according to the manufacturer’s directions.
- Validation/Verification:
- Determine the appropriate number of known positive and negative cases for the validation/verification plan.
- For FDA-cleared/approved assays, laboratories may follow instructions provided by the manufacturer regarding the number of samples to be used for assay verification.
- Absent instructions for an FDA-cleared/approved assay—and for all modified FDA-cleared/approved assays and laboratory-developed tests—predictive markers require a minimum of 20 positive and 20 negative cases per the CAP Center Guidelines, compared to 10 positive and 10 negative for non-predictive markers1.
- Rare analytes or low frequency antigens may prove a challenge and require collaboration with other laboratories, use of cell lines, or other creative strategies.
- The laboratory/medical director ultimately determines how many cases to include, but if the number is less than what’s recommended, a scientifically-supported justification should be documented in laboratory records.
- Identify known positive and negative cases.
- Ideally, a range of expression levels should be included.
- Ways to define predetermined expected results vary but can include:
- The result of a different or previously used validated test targeting the same analyte
- A validated non-IHC method (eg, ISH or molecular)
- A tissue or tumor type defined by specific protein expression
- Stain and interpret the appropriate number of expected positive and negative cases.
- Using tissue arrays, multi-tissue blocks, or multiple sections per slide can reduce reagent use and cost.
- Analyze the results.
- The typical overall concordance threshold is 90%, but any discordant results should be scrutinized.
- Concordance among the positive and negative cohorts alone should be reviewed.
- Failing to achieve concordance among positive cases (observing false negatives) but not among negative cases suggests that assay sensitivity is inadequate.
- Failing to achieve concordance among negative cases (observing false positives) but not among positive cases suggests that assay specificity is inadequate.
- Failing to achieve concordance among both positive and negative cases suggests a general problem with the assay or with the selection of cases.
- Determine the appropriate number of known positive and negative cases for the validation/verification plan.
- Clinical go-live for the new stain
- Communicate the new stain’s availability and describe its utility to help guide appropriate ordering.
- Assay maintenance
- Carry out ongoing monitoring.
- Encourage feedback from colleagues, especially cases where results differ from the expected.
- Ideally, track positive and negative rates for predictive markers to compare with benchmarks.
- Continue lot-to-lot stain comparisons.
- Identify and ensure a supply of appropriate control.
- On-slide controls are preferred whenever possible; batch controls are also acceptable.
- Tissue controls should experience or otherwise be exposed to similar pre-analytic parameters as patient tissue.
- In some situations, vendor-supplied or synthetic controls may be necessary, especially for rare antigens.
- Enroll in PT or alternative assessments with another laboratory.
- Carefully review results for trends suggesting the assay may be 'drifting' or lacking appropriate sensitivity or specificity.
- Carry out ongoing monitoring.
References
- Goldsmith JD, Troxell ML, Roy-Chowdhuri S et al. Principles of Analytic Validation of Immunohistochemical Assays. Guideline Update. Arch Pathol Lab Med. 2024; 148(6): e111-e153.
Last updated: November 4, 2025
Adding to a laboratory’s test menu is a multifaceted decision, which must consider clinical utility and demand (both the significance of the result and the required timeliness), the cost, and the resources needed to onboard and perform the test. Pathologists may request that a laboratory validate/verify a recently published diagnostic marker, or clinicians may ask for the validation/verification of a predictive marker that would yield important information about the potential benefit of a therapeutic agent.1
When a laboratory medical director receives a request for assay validation or verification, a thorough investigation is needed before a laboratory makes a commitment. This investigation is often the most time-intensive part of bringing up a new IHC assay—but it’s well worth the investment, as it can provide both valuable information and potentially savings in both cost and time.
It can be helpful to have a standard pre-validation/verification investigation document to guide the process (download a sample template). This document or worksheet can be modified as appropriate for the laboratory and might include prompts for consideration.
- An annual estimate of the number of slides to be stained with the candidate marker is a critical early step to determine if validating/verifying the assay will be cost effective. The decision should weigh the costs and benefits of performing the assay in-house versus sending out samples to a reference laboratory.
- Perform an in-depth review of primary literature and other resources, such as NordiQC (www.nordiqc.org), which publishes detailed, clone-specific external quality assessment data and makes autostainer platform-specific protocol recommendations; www.ihcfaq.com, a free online complement to the textbook Handbook of Practical Immunohistochemistry (Springer 2015); www.pathologyoutlines.com, which curates content on diagnostic applications of immunohistochemical markers; and IHC data sheets (aka “product inserts”), which are available, typically in PDF form, for each vendor’s formulation (monoclonal or polyclonal) for a given marker. The goal of this review is to identify or confirm, as needed:
- Antibody vendor
- Antibody clonality (monoclonal or polyclonal; specific clone name and host [typically mouse or rabbit], if monoclonal)
- Potential assay parameter considerations such as antibody dilution, ready-to-use options, and additional protocol considerations
- Possible additional assay diagnostic applications (ie, “purposes”) beyond the initial request
- Performance of the chosen clone in normal and diseased tissues with an emphasis on differential diagnostic considerations (ie, theoretical diagnostic sensitivity and specificity)
- Known performance issues associated with specific clones
- Appropriate gold-standard comparison method(s) by which assay concordance will be determined (eg, diagnostic accuracy based on the published literature; results of orthogonal testing including molecular testing or FISH; parallel testing in a laboratory having already validated/verified a given marker)
- Discussion with pathologists and/or clinicians involved in ordering the IHC assay to confirm, as needed:
- Clone preference
- Anticipated applications (diagnostic, prognostic, and/or predictive) as different purposes may affect the nature and extent of the validation/verification
- Projected volumes
- How test results will be reported
- Discussion with laboratory staff regarding:
- Is there sufficient material available for validation/verification, including from cases that will be in the diagnostic differential (ie, expected negative cases)?
- If there isn’t sufficient material in-house, how will it be obtained?
- Is there a source for the anticipated amount of control tissue?
- Are there laboratory policies (eg, restriction against use of research use only [RUO] antibodies), purchasing agreements, or preferred vendor relationships that constrain antibody clone choice?
- How will anticipated test volumes and the test protocol affect the current workflow?
- Which testing platform (ie, autostainer) will be used, if multiple options are available?
- Are there IT issues related to result reporting and billing (eg, disclaimer modification required)?
Depending on the laboratory’s organization and preference, we recommended that the above be reviewed and discussed in meeting(s) with all relevant stakeholders present, including (as applicable) the laboratory medical director, the IHC technical specialist or laboratory subsection director, and/or the lead immunohistochemistry laboratory staff. Any stakeholder may express concerns about committing to the validation. If these concerns cannot be resolved, it may not be best to continue.
Reference
- Torlakovic EE, Cheung CC, D'Arrigo C, Dietel M, et al. From the International Society for Immunohistochemistry and Molecular Morphology (ISIMM) and International Quality Network for Pathology (IQN Path). Evolution of Quality Assurance for Clinical Immunohistochemistry in the Era of Precision Medicine. Part 3: Technical Validation of Immunohistochemistry (IHC) Assays in Clinical IHC Laboratories. Appl Immunohistochem Mol Morphol. 2017 Mar;25(3):151-159.
Last updated: November 4, 2025
After the pre-validation/verification investigation is complete, the lab must obtain the chosen antibody and identify/assemble a validation/verification cohort of paraffin blocks from relevant tissues (see question 6 for more details on validation cohorts).1
A subset of cases from the validation/verification cohort will be used for assay optimization. At least one, but preferably more than one block should be used; this allows for the potential range of expression of the analyte to be reflected, and mitigates the effect of pre-analytic variables that might affect staining in any one tissue block. Expected positive and negative tissue types should be included—testing more than a few blocks is unnecessary in this step. Multi-tissue blocks or tissue microarrays are useful here, if they’re available.
The goal of assay optimization is to establish assay working conditions for the subsequent validation/verification. Tissues are examined at different assay conditions to confirm reliable, appropriately localized, positive staining at an acceptable intensity while minimizing non-specific background staining (optimum “signal-to-noise” ratio).
Parameters to consider include antigen retrieval type and duration, primary antibody dilution, primary antibody incubation duration, and detection incubation duration.2 If available, various staining platforms might be tried occasionally. Many antibodies come prediluted (ie, ready-to-use). While prediluted formulations certainly make things easier, they aren’t always optimal due to the available staining platforms, potential fixation concerns, or other conditions. For antibody formulations received in concentrate, the primary dilution may be selected based on a variety of factors: published literature, reputable IHC websites (eg, NordiQC), manufacturer’s recommendations, or even personal communication with labs that already successfully use the antibody. In the absence of such guidance, a starting point of 1 μg/mL is reasonable (eg, 1:100 if the antibody stock solution is at a concentration of 100 μg/mL).
If using a concentrate for the initial optimization, it’s useful to examine the antibody at a given dilution at two or more antigen retrieval conditions (typically at low and high pH heat-induced epitope retrieval). It’s also useful to examine two-fold serial dilutions above and below your selected starting point with at least one antigen retrieval condition (download a sample Antibody Optimization template).
With this initial experiment, one set of assay parameters is often associated with a better signal-to-noise ratio (eg, stronger signal at a given dilution; no/less background staining at a given dilution—ideally both but sometimes one at odds with the other). Additional refining conditions can be assessed based on these initial results.
Laboratories typically have a preferred or most-commonly-employed (baseline) set of antigen retrieval type and duration, primary antibody incubation conditions, and detection chemistry incubation durations. Some of these baseline conditions may be based on optimizing instrument capacity or other whole-laboratory workflow processes. However, these can—and, if necessary, should be—further optimized as needed. Durations can be lengthened to enhance signal at a given dilution (though possibly at the expense of background staining) or shortened to mitigate background (though possibly at the expense of signal). Occasionally, a background-reducing blocking step is needed to deal with non-specific staining, though most issues with background can be handled by optimizing retrieval, primary antibody dilution, and timing. Sometimes signal amplification is necessary; however, that often comes at the cost of occasional granular non-specific staining.
The optimized protocol is subsequently applied to the validation/verification cohort. Slides are reviewed by the medical director (or another pathologist, ie, the proponent of the stain) to determine concordance with the pre-determined standard result (eg, morphologic diagnosis, results of panel of established IHC markers supporting the diagnosis, available molecular studies that are consistent with the diagnosis). If acceptable concordance is not achieved, discrepancies should be investigated (eg, clerical error, the possibility that a “positive” case was misclassified as a “negative” case or vice versa due to prior diagnostic error, use of orthogonal methodologies with differing sensitivities, etc). Sometimes discrepancies can be resolved by sending unstained slides from discrepant cases to an independent laboratory, which has already validated/verified the test, for a “tie-breaker” result. Sometimes assay conditions need to be re-optimized and the staining of the validation/verification cohort has to be repeated with the re-optimized conditions.
The assay may be performed, interpreted, and resulted on patient samples when:
- Acceptable concordance has been achieved in a sufficient number of cases based on the intended use of the marker.
- The medical director has completed necessary documentation.
- All other necessary processes have been implemented (eg, identification of control material, creation of an electronic order for the stain, report disclaimers modified if needed; download a sample Antibody Validation Checklist template here).
References
- Hsi ED. A practical approach for evaluating new antibodies in the clinical immunohistochemistry laboratory. Arch Pathol Lab Med. 2001 Feb;125(2):289-94.
- https://www.labome.com/method/Antibody-Dilution-and-Antibody-Titer.html
Last updated: November 4, 2025
Diagnostic markers are performed to support or refute a morphologic impression. Because only rare IHC markers are specific for a certain disease, IHC stains are often performed as part of a panel. The diagnostic pathologist incorporates these results into the histomorphologic diagnosis (ie, while they’re often essential, they’re ancillary to the diagnosis). Examples include keratin, S100, SOX10, desmin, etc.1
For a given tumor type, prognostic markers provide probabilistic information on patient outcome (eg, likelihood of tumor recurrence, likelihood of survival at a specified follow up interval). Examples include Ki-67 in some conditions.
Predictive markers provide information on the likelihood of a patient responding to a specific therapy. This information is independent of morphology. Predictive markers can be performed concurrent to the diagnosis, but they may also be ordered after the fact—even years later in the setting of tumor recurrence/metastasis or failure of other treatment lines. At some institutions, predictive markers are performed as reflex testing for certain diseases/stages of disease; at others, predictive markers are chosen and requested by clinicians, particularly oncologists, who make therapy decisions based on the results.
The results of predictive marker IHC testing may drive clinical decision-making independent of other factors, especially tumor morphology in some situations. In addition, because any administered therapeutic is associated with the risk of side effects—some of which could be life-threatening—the performance and resulting of predictive marker testing receive greater scrutiny in terms of validation/verification and external quality assessment (EQA) than diagnostic markers. Examples include PD-L1, estrogen receptor (which also can be a diagnostic marker), and HER2.
Some markers fulfill more than one of these roles, sometimes even in the context of a single case. In some instances, a marker that’s merely diagnostic in one setting is predictive in another. Knowing for which purpose(s) a given marker will be used is vital, as it dictates the extent of validation/verification and the necessity of EQA.
Reference
- Cheung C, D’Arrigo C, Dietel M, et al. Evolution of Quality Assurance for Clinical Immunohistochemistry in the Era of Precision Medicine: Part 1: Fit-for-Purpose Approach to Classification of Clinical Immunohistochemistry Biomarkers. Appl Immunohistochem Mol Morphol. 2017. Dec;25(1)4-11.
Last updated: November 4, 2025
For non-predictive (diagnostic and prognostic) assays:
- Unmodified FDA-cleared/approved assay: Follow instructions provided by the manufacturer. If instructions do not list a minimum number of samples for assay verification, use a minimum of 10 positive and 10 negative tissues; concordance target ≥90%
- Laboratory developed tests (LDTs) and modified FDA-cleared/approved assays: Minimum of 10 positive and 10 negative cases; concordance target ≥90%
For predictive assays:
- Unmodified FDA-cleared/approved assay: Follow instructions provided by the manufacturer. If instructions do not list a minimum number of samples for assay verification, use a minimum of 20 positive and 20 negative cases; concordance target ≥90%
- LDTs or modified FDA-cleared/approved assays: Minimum of 20 positive and 20 negative cases; concordance target ≥90%
- Markers with distinct scoring systems (eg, HER2, PD-L1): Minimum of 20 positive and 20 negative cases PER assay-scoring system combination
Notably, previous CAP/ASCO guidelines for ER and HER2 (including the 2023 HER2 update) specified that LDT assays for these hormone receptors should be validated with a higher number (40 positives and 40 negatives for a total of 80 cases). However, the 2024 CAP Center Guideline on Analytic Validation of Immunohistochemical Assays states:
"Additional goals of these revised recommendations are to harmonize previously variable recommendations for analytic validation or verification of predictive markers, including human epidermal growth receptor 2 (HER2), estrogen receptor (ER), and progesterone receptor (PR) IHC performed on breast carcinoma; to create validation recommendations for companion and complementary IHC assays with distinct scoring systems based on tumor type (eg, PD-L1); and to reevaluate the validation requirements for non–formalin-fixed tissues, including cytology specimens. These modifications are based on the systematic review of the medical literature."
The 2024 CAP Center Guideline does not distinguish HER2 or ER from any other predictive marker. As a result, these guidelines supersede the prior CAP/ASCO recommendations and apply to all predictive markers (including ER and HER2).
The 2024 CAP Center Guideline does state that at times, more than the minimum number of cases may be needed or desired to achieve the required concordance rate and/or to assure that the assay performs acceptably. The expected positives in the validation cohort should encompass all the intended purposes of the assay and, if possible, should include cases demonstrating a range of antigen expression (ie, they should not only include strong positives). The expected negatives should include cases that are differential diagnostic considerations for the cases in the expected positive cohort, to ensure the assay achieves sufficient diagnostic sensitivity and specificity.
If an assay is intended for diagnostic and predictive purposes, the extent of the validation should be at least as extensive as for a predictive marker.5
In addition to the above, it’s best to run the assay in multiple normal tissues (a multi-tissue block or TMA is a useful tool for this purpose) to look for aberrant staining, which might not be reported in the literature (this is referred to as extended analytical specificity). For new IHC antibodies with limited literature, it’s important to monitor the literature over time, as reported test characteristics tend to change over time as more data is available.
References
- Goldsmith JD, Troxell ML, Roy-Chowdhuri S, et al. Principles of Analytic Validation of Immunohistochemical Assays. Guideline Update. Arch Pathol Lab Med. 2024; 148(6): e111-e153.
- Wolff AC, Somerfield MR, Dowsett M, et al. Human Epidermal Growth Factor Receptor 2 Testing in Breast Cancer: American Society of Clinical Oncology-College of American Pathologists Guideline Update. Arch Pathol Lab Med. 2023 June;147(9):993-1000.
- Fitzgibbons PL, Murphy DA, Hammond ME, Allred DC, Valenstein PN. Recommendations for validating estrogen and progesterone receptor immunohistochemistry assays. Arch Pathol Lab Med. 2010 Jun;134(6):930-5.
- Allison KH, Hammond MEH, Dowsett M, et al. Estrogen and Progesterone Receptor Testing in Breast Cancer: American Society of Clinical Oncology/College of American Pathologists Guideline Update. Arch Pathol Lab Med. 2020 May;144(5):545-563
- Cheung CC, D'Arrigo C, Dietel M, et al. From the International Society for Immunohistochemistry and Molecular Morphology (ISIMM) and International Quality Network for Pathology (IQN Path). Evolution of Quality Assurance for Clinical Immunohistochemistry in the Era of Precision Medicine: Part 4: Tissue Tools for Quality Assurance in Immunohistochemistry. Appl Immunohistochem Mol Morphol. 2017 Apr;25(4):227-230.
Last updated: November 4, 2025
No, validation/verification for each tumor type is not needed. For initial analytic validation of laboratory- developed tests (LDTs) and verification of FDA-cleared/approved predictive immunohistochemical assays with distinct scoring schemes (such as PD-L1 or HER2), laboratories should separately validate/verify each antibody-scoring combination with at least 20 positive and 20 negative cases.
The validation/verification set should include challenges that are representative of the intended clinical use of the assay, and at the discretion of the laboratory director may include more than one tumor type if the scoring system/assay readout is the same.
- Goldsmith JD, Troxell ML, Roy-Chowdhuri S, et al. Principles of Analytic Validation of Immunohistochemical Assays. Guideline Update. Arch Pathol Lab Med. 2024; 148(6): e111-e153.
Last updated: November 4, 2025
For CAP-inspected laboratories, the type of specimen fixative and processing, antibody clone, detection system, and assay read-out and interpretation criteria should be included in the report in addition to the patient results for predictive assays. Some of these parameters are included in CAP Biomarker Synoptic Reports1 or can be detailed in report disclaimers. The patient report should also include information on limitations relating to suboptimal preanalytical factors that may affect results, such as unknown or prolonged cold ischemia time, or over- or under-fixation.
Last updated: November 4, 2025
There are several options to consider in selecting a standard comparator method for an immunohistochemical validation/verification. Practically and economically speaking, if the antibody to be validated/verified is currently being performed as a send-out IHC test at another laboratory, it’s usually simplest to use prior send-out test results as the comparator method. Demonstrating concordance with positivity rates reported in the medical literature is also acceptable. Previous results from a previously validated/verified assay from the same laboratory can be used as well, if the assay conditions change to such an extent that a revalidation/reverification is merited. For example, if a manufacturer discontinues a primary antibody and it’s replaced with a different primary antibody clone, then the use of the results obtained from previously validated/verified assays from the same laboratory could be used as a comparator.
For certain tests, comparison with a molecular standard may be an option. For example, validation/verification of point mutation specific antibody clones (eg, IDH1 R132H or BRAF V600E) may be compared to results of a molecular assay confirming the point mutation. However, it’s necessary to understand the output of the molecular assay in advance—using a BRAF V600 molecular assay to define “positive” cases may actually include cases in which the substituted amino acid is not glutamic acid (non-E) but a different amino acid, resulting in conformational changes that the BRAF V600E clone doesn’t recognize. This could result in insufficient concordance to complete validation/verification. Comparison with flow cytometry analysis for markers such as CD3, CD20, and other common hematopoietic analytes can be used as well as a comparator with immunohistochemistry assays.
Publications describing methods of antibody validation/verification have also advocated for three additional options:
- Determining concordance with an alternative antibody that binds to a non-overlapping epitope of the antigen
- The use of orthogonal methods
- The use of a genetic method of validation1-3
The third option includes the potential to validate/verify against cell lines with established quantitative levels of protein expression. Although not presently widely available, cell line materials with known expression levels are likely to become an important part of antibody validation/verification in the future.
References
- Goldsmith JD, Troxell ML, Roy-Chowdhuri S, et al. Principles of Analytic Validation of Immunohistochemical Assays. Guideline Update. Arch Pathol Lab Med. 2024; 148(6): e111-e153.
- MacNeil T, Vathiotis IA, Martinez-Morilla S, et al. Antibody validation for protein expression on tissue slides: a protocol for immunohistochemistry. BioTechniques. 2020 Jun;69.
- Uhlen M, Bandrowski A, Carr S, et al. A proposal for validation of antibodies. Nature Methods. 2016 Oct;13(10):823-827.
Last updated: November 4, 2025
As part of the validation process, labs must carefully consider the feasibility of procuring not only enough positive and negative cases for the validation plan, but to also ensure a continuous supply of control tissue to maintain the assay. This is obviously a challenge for rare antigens, and there isn’t an easy answer for most laboratories.
Potential strategies for identifying a supply of these resources include obtaining tissue from other institutions (or potentially outside vendors), identifying in-house cases shown to be positive using another validated methodology (FISH, molecular, IHC performed at a reference laboratory, etc), or using engineered cell lines that were fixed in formalin after culturing for an appropriate period of time.
When partnering with other institutions it’s important to understand how other laboratories’ pre-analytic processes compare to your own. Significant differences in pre-analytic processes for specimens obtained from other institutions or vendors could affect the validity of validation/verification testing to the extent that results may not necessarily be generalizable to samples in your laboratory.
If an initial effort to find enough cases to complete a planned validation falls short, a laboratory could start a validation with all available cases and add to this number in the course of a parallel testing strategy. If the laboratory director determines that fewer validation cases are sufficient for a specific marker (eg, a rare antigen, tissue, gene, or probe), the rationale for that decision must be recorded before offering the test for clinical use. During parallel testing, tests on patient tissue are performed in-house AND in parallel are referred to another reference laboratory with results being reviewed for concordance and added to the validation set until the requisite number of cases is accumulated.
After validation, the importance of external quality assessment for rare antigens cannot be overstated. This is particularly true for predictive markers with low prevalence. Subscribing to the appropriate CAP proficiency test (PT) or other alternative assessment program develops trust in the assay performance. The CAP IHC committee prioritizes developing and expanding these types of survey and PT products, anticipating the critical need for these in the IHC laboratory community.
Last updated: November 4, 2025
Immunocytochemical assays (ICCs) are tests performed using cytologic preparations as a substrate (versus traditional formalin-fixed paraffin-embedded histologic sections as seen in surgical pathology). Cytologic preparations come in many forms, including formalin-fixed paraffin-embedded cell blocks, alcohol-fixed paraffin-embedded cell blocks, paraffin-embedded cell block material fixed sequentially in alcohol and formalin, unstained liquid-based preparations (alcohol fixatives), and air-dried cytologic smear specimens.
The 2024 Principles of Analytic Validation of Immunohistochemical Assay update recommends that, for initial analytic validation of IHC performed on cytologic specimens that are not fixed in the same manner as tissues used for initial assay validation, a separate validation should be performed for every new analyte and corresponding fixation method.
In this situation, a minimum of 10 positive and 10 negative cases is recommended for each validation performed on cytologic specimens, if possible. It’s recommended that laboratory directors consider increasing this number if predictive markers are being validated. Furthermore, if the minimum 10 positive and 10 negative cases isn’t feasible, the rationale for the number of cases used should be documented.1
As a starting point, when possible, protocols are typically borrowed from those used for validating/verifying assays on formalin-fixed paraffin-embedded tissue and then further optimized on the cytologic samples.
The guidelines do not comment on whether laboratories need to bring previously validated/verified assays into compliance with 2024 guideline recommendations. For CAP-inspected laboratories, CAP checklist requirements would supersede best practice recommendations. If review of the initial validation/verification doesn’t meet the current requirement, it must be supplemented and brought into compliance. Indeed, given the importance of predictive markers’ results to patient care, assay verification/validation rigor should meet best practice expectations wherever possible.
References
- Goldsmith JD, Troxell ML, Roy-Chowdhuri S, et al. Principles of Analytic Validation of Immunohistochemical Assays. Guideline Update. Arch Pathol Lab Med. 2024; 148(6): e111-e153.
Last updated: November 4, 2025
There are several factors to consider when thinking about control tissues, including tissue type(s), range(s) of antigen expression in tissue components, and availability/scarcity of blocks and/or tissue at your disposal.1–3
The question of whether to perform individual on-slide versus batch controls is also relevant to this discussion. A positive control must be used for each antibody performed. A routine negative control for each antibody is not required since polymer-based detection kits have obviated the reagent need for endogenous biotin checking and most patient samples include intrinsic negative control cells. A single control slide can be run for a batch of tests using the same antibody (“batch control”) or a control tissue section can be put onto each individual patient slide (“on-slide control”). On-slide controls are preferred whenever possible but are not required. Also, for some immunohistochemical tests a positive internal control (eg, benign endothelial cells in BRG1) is required and therefore an on-slide control may not necessarily be needed. On-slide controls should be clearly demarcated on the slide to prevent misinterpretation.
For some markers (eg, ER), there are recommendations regarding the types of control tissue to be used. The most recent ASCO/CAP ER/PR guidelines recommend a four-tissue multi-tissue control block including an ER strong positive tumor, an ER negative tumor, normal breast, and tonsil (as a reproducible ER low positive tissue type).3 For most remaining markers, specific tissue guidelines do not exist. In these situations, the ideal is to use reliably positive control tissue that can be easily obtained from discarded tissues or obtained commercially in an economical way. If commercial suppliers are used, problems with reproducing the laboratory’s fixation and processing methods may occur.4 Further, the preference is to use tissue types expressing normal constitutive or even low levels of antigen (low positive cases) so assay sensitivity can be confirmed with each run and false negative results avoided.
In addition to external control tissues, it’s also recommended that pathologists routinely and systematically examine any available internal control cell types. Examination of the internal control in cases of ER immunohistochemistry is a required element in the CAP breast biomarker synoptic template, which aligns with recent ASCO/CAP guideline updates.3
Synthetic and calibrated analyte control slides are becoming increasingly available and can be especially helpful in the situation of rare analytes. The 2024 version of the CAP Anatomic Pathology Checklist for Laboratory Accreditation includes this revision for item ANP.22550 "QC – Antibodies":
The explanatory note for this item has been expanded to include these statements:
"Synthetic materials (eg, microbeads) and cell lines containing IHC analytes of interest may be run as controls in addition to positive tissue controls. Synthetic controls and cell lines should contain the target epitope of the IHC assay. Controls that assess the IHC protocol should be sensitive to the antigen retrieval step. Synthetic and cell line-based controls can be particularly useful to assess assay performance at low expression levels, such as detecting low levels of expression in breast cancer. Synthetic and cell line-based controls are not ideal for optimizing digital pathology algorithms, which are optimally tuned to IHC expression in human tumors."
References
- Goldsmith JD, Troxell ML, Roy-Chowdhuri S, et al. Principles of Analytic Validation of Immunohistochemical Assays. Guideline Update. Arch Pathol Lab Med. 2024; 148(6): e111-e153.
- Dabbs DJ. Diagnostic Immunohistochemistry: Theranostic and Genomic Applications. 5th edition. 2019. Elsevier. Chapter 1.
- Allison KH, Hammond MEH, Dowsett M, et al. Estrogen and Progesterone Receptor Testing in Breast Cancer: American Society of Clinical Oncology/College of American Pathologists Guideline Update. Arch Pathol Lab Med. 2020 May;144(5):545-563
- Goldsmith JD, Troxell ML, Roy-Chowdhuri S, et al. Principles of Analytic Validation of Immunohistochemical Assays. Guideline Update. Arch Pathol Lab Med. 2024; 148(6): e111-e153.
Last updated: November 4, 2025
There are several reasons for "sunsetting" an IHC assay. Most IHC assays slated for retirement have become diagnostically redundant/irrelevant, having been replaced by more sensitive and/or specific IHC markers, the same antibody from different clones, or alternative testing methods. When an assay no longer serves a useful clinical purpose and prevents a better stain from being used by remaining on the menu, it should be retired, even if resource costs are relatively low.
Infrequent ordering is another common reason for eliminating an IHC assay from the test menu. Given reagent costs and the limited antibody expiration time window, it may be more cost effective to retire a rarely used in-house test and change it to a send-out test.
Availability of antibody clones may change as manufacturers reassess the revenue potential of their products and/or consolidate and merge over time. As mentioned before, it may prove impossible to maintain a supply of control tissues for some antibodies, necessitating removal from the test menu.
Last updated: November 4, 2025
The CAP Accreditation Program requires PT or alternative performance assessment (APA) for laboratories performing predictive marker testing using IHC based on the specific markers performed and the scope of services performed on site. Checklist requirement COM.01520 (PT and Alternative Performance Assessment for Staining of IHC Predictive Markers) outlines PT and APA requirements for predictive marker testing by IHC. Currently
the following IHC predictive markers require PT enrollment: breast ER, breast HER2, gastric HER2, lung high sensitivity ALK, and lung PD-L1 TPS.
- Laboratories performing both IHC staining and interpretation at the same laboratory must enroll in PT.
- Laboratories only performing predictive marker IHC staining (slides interpreted at a different laboratory) must perform APA.
- Laboratories only performing predictive marker IHC interpretations (slides are stained at a different laboratory) are not required to enroll in PT or perform APA. See ANP.10010 Professional Competency.
Laboratories may continue to use PT to meet requirements for APA and pathologist professional competency. For "interpretation only" laboratories where slides are prepared elsewhere, the CAP offers a digital pathology format interpretation-only survey for HER2 and ER interpretation (HERI), gastric and pan-tumor HER2 interpretation (GPH), and lung PDL1 (TPS) interpretation with other interpretation only surveys in development. A list of currently available CAP IHC Surveys is available here.
For all other IHC predictive markers (MMR, CD30, CD20, etc), semiannual APA is required for laboratories performing both IHC staining and interpretation at the same laboratory, and for laboratories only performing IHC staining. The CAP does not require enrollment in PT for these analytes. APA can be accomplished in many ways, and a laboratory director can determine which option makes sense for a given laboratory. Laboratories should review their ongoing quality plan annually to ensure they are enrolled in the required PT programs and, as appropriate, are performing APA.
References
- CAP Checklist version 2025
Last updated: November 4, 2025
A written quality management plan is required of anatomic pathology (AP) laboratories by CAP Laboratory Accreditation Programs. Although this requirement is for the entire AP laboratory, laboratory subsections stand to benefit from a similar, standardized approach focused on their subsection content.
Elements of a quality plan for the IHC laboratory could include a mission statement, specific to the IHC lab, that is in alignment with any mission statement of the laboratory and/or institution; identification of laboratory team members with definition of responsibilities; identification of IHC quality management committees with definition of responsibilities; identification of specific ongoing QI projects and project team members, their responsibilities, and project timelines and/or a list of specific monitors including reporting schedule and reference benchmarks; assessment of risks; calendar of quality topics and/or monitored tests/projects that require regular, systematic data or literature review; data required for reporting to the hospital/laboratory quality management committee; and incident reporting monitoring and results.
An IHC-specific process improvement assessment plan is an important component. Additional elements might include utilization data, results of pathologist read-out assessments (competency assessment), annual pathologist quality assessment, annual review of proficiency testing (PT) subscriptions, and future goals for the laboratory.
It’s also helpful for the IHC laboratory to consider the IHC process comprehensively to identify pain points—points in the process where error is possible or likely, or where inefficiency and waste can be minimized. This review can be started with a value stream map. When potential non-conforming events and the points in the process at which they might occur are identified, appropriate procedures can be put in place to prevent or detect the error quickly.
Ultimately, forming a quality plan for any part of the laboratory requires strong collaboration with quality assurance professionals and strong leadership from laboratory medical directors to make quality assurance a priority.
References
- Zhai Q and Siegal GP, eds. Quality Management in Anatomic Pathology Strategies for Assessment, Improvement, and Assurance. 2017 CAP Press. Northfield, IL.
Last updated: November 4, 2025
Any concern about the performance of any assay in the laboratory should trigger at minimum an informal process improvement assessment. A single unacceptable response (one core on a 10 core TMA) due to a clerical error may not lead to significant change in the laboratory, but the cause of an unacceptable response must be determined, to the extent possible, and triaged appropriately by laboratory leadership. Conversely, investigation of a single unacceptable response could identify a situation requiring a complex improvement plan requiring assay re-validation. Therefore, review and assessment of all unacceptable responses, regardless of whether the laboratory achieves an overall acceptable score for the survey, is recommended.
An unsuccessful event indicates the laboratory did not achieve overall acceptable concordance with the intended responses (eg, did not achieve a passing score). In this situation, the lab should initiate a comprehensive process improvement assessment, taking appropriate corrective action for each unacceptable result.
In case of an unsuccessful PT event, careful attention should also be given to the process improvement assessment step D3: interim containment action (depending on the assay in question). If the marker is a predictive marker, it may be appropriate to stop in-house testing until corrective action is implemented. The full process improvement assessment outline is described in the next question.
Last updated: November 4, 2025
A process improvement assessment (PIA) is a standard, systematic approach used to identify pain points and sources of error, waste, or inefficiency in a process. Many methodologies derived from manufacturing-based industry exist to guide process improvement assessment and planning. Inasmuch as laboratory processes are similarly attempting to generate a product with minimal error and waste, these methodologies can be directly applied to IHC laboratory processes or applied with minor modifications. An intuitive process improvement method developed by Ford Motor Company in the 1980s is the Eight Disciplines Problem Solving Method (8D).1 This process includes principles found in other methodologies, most notably Lean/Six Sigma.2-7
The 8D method uses the following steps:
- D0: Prepare and plan for the 8D process
- D1: Form a team
- D2: Describe the problem
- D3: Interim containment action (immediate steps to protect patients, if necessary)
- D4: Root cause analysis
- D5: Permanent corrective action (long-term plan, corrective and preventive action plan [CAPA])
- D6: Implement and validate the permanent corrective action
- D7: Prevent recurrence
- D8: Closure and team celebration
Process improvement and planning tools exist to help complete steps of the 8D method:
D0: Prepare and plan for the 8D process
At the beginning of the process improvement assessment, information is collected to estimate the required personnel and time for the project. It may be helpful to use problem assessment templates such as Fishbone or Pareto Diagrams to map the issues and questions to consider for problems identified by PT results or control failures.
At this step, as in step D3, careful consideration must be given to minimizing any effect on patients due to the possible source(s) of error. If it initially appears that the problematic output from the laboratory could have significant negative effect on patients, then a decision about an interim containment plan (step D3) must be made in a timely manner, and the project timeline must reflect this urgency.
In some laboratories, the need for an interim containment plan and timeline for implementation of corrective action may be guided by risk ranking and risk prioritization plans that use established patient safety harm categories and safety assessment code matrices.
Various project management tools can be used to organize and visually represent phases of the project. A Gantt chart (www.gantt.com) is essentially a horizontal bar chart that can be used to visually represent phases of a project and tasks scheduled over time. Gantt charts can be created using a template within Microsoft Excel.
D1: Form a team
In this step, a multidisciplinary team representing relevant stakeholders is assembled. Responsibilities need to be clearly assigned: A team leader—and, for major process improvements, a senior “champion”—should be identified. The latter is someone with sufficient organizational clout to minimize obstacles that may come up during the process. For example, in the case of a faulty breast predictive marker, the team could include breast pathologists or the pathology chief, the IHC medical director, breast surgeons and/or oncologists, and laboratory staff.
Tools are available to help identify process parts and stakeholders, and to assign responsibilities such as a SIPOC diagram or responsibility assignment matrix.
D2: Describe the problem
The problem definition may appear straightforward; however, it’s always best to approach problem definition in an open-minded manner driven by genuine curiosity. A common tool used for problem definition is called “Five Whys,” where one repeatedly self-questions explanations.
Here’s an example: The issue at hand is that the laboratory did not achieve acceptable concordance with the intended responses for a proficiency test:
Ask why #1:
Because, compared to the intended responses, we resulted in 3 of 10 cores on the TMA getting a negative response when the intended response was positive.
Ask why #2:
Because we didn’t see staining in these cores.
Ask why #3:
Because it’s possible our assay is insufficiently sensitive to detect the protein of interest in these three cores.
Ask why #4:
Because our assay parameters don’t align with those reported by the majority of participating laboratories using similar platforms.
Ask why #5:
No reason; we didn’t realize that our assay parameters were different than those used in other laboratories using similar platforms, so we failed to consider the most commonly used parameters when we performed the initial validation.
So, in this example, a problem definition may be: Our IHC assay appears insufficiently sensitive to detect low positive results, potentially due to suboptimal assay parameters.
Other tools used in this step may include simple flowcharts, Fishbone diagrams, Is/Is not comparison, or affinity diagrams.
D3: Describe the problem
Based on the problem definition, an interim containment action should be verified and implemented if necessary. An interim containment plan is intended to be a preliminary stopgap and is often replaced by the permanent corrective action (step D5). In immunohistochemistry, the easiest interim containment plan is to stop performing the assay in-house and send-out material to a reference laboratory.
D4: Root cause analysis (RCA)
The root cause analysis (RCA) will take different forms with different tools applied, depending on the problem definition. The goal of a RCA is to determine the primary source of the error and the escape point, or the first point at which the error might have been detected but was not.
Tools such as failure mode and effect analysis (FMEA), fault tree analysis, or possibly a value stream map can be applied. Some tools from step D2 are also helpful in a RCA (Five Whys, Fishbone diagram). In the process of performing an RCA, more potential sources of error may be identified—using our previous example, while looking at all testing phases, the lab may also discover that the particular TMA slide wasn’t handled in the recommended manner prior to testing (possible global decrement in antigenicity), that the pathologist readout was near a subjective, difficult to reproduce threshold, or that there was a simple clerical error and that the readout pathologist selected the wrong bubble responses (negative, <1% when intended to select positive 1–10%). If other sources are identified, the problem definition and possible solutions can be further expanded.
It remains advisable to approach the RCA with an open-minded, genuine curiosity. While pursuing the root cause and escape point, it’s imperative that team members and team leaders cultivate a non-pejorative, transparent team culture.
D5: Permanent corrective action (PCA)
The permanent corrective action is directed against the root cause and removes or alters the conditions that were responsible for the problem. Prior to selecting the permanent corrective action (PCA), acceptable performance criteria must be established, including any mandatory performance criteria, and the effectiveness of the PCA must be demonstrated.
When there’s a choice of PCA, the team leader must work to make a balanced choice and to consider favoring choices that attend to the escape point as well, so that if error reoccurs, it will be captured at the escape point and any effect on patients may be minimized. (The escape point for predictive markers is likely to be correlation with morphology [such as in breast], results of peer review or adjudication procedures, or quarterly quality monitoring reports.) Tools exist to assess choices (FMEA), but often the team’s professional judgment or asking questions of a colleague with more experience at another institution are sufficient to make a choice.
D6: Implement and validate the permanent corrective action
After a PCA has been chosen, the performance of the PCA—using performance criteria specified in step D5—must be validated. Continuing with the example of insufficient assay sensitivity, a laboratory may choose to revalidate the assay using increased incubation time for the primary antibody. Depending on the application of the marker in question, achieving acceptable concordance with a pre-determined gold standard in the required number of cases for assay validation will constitute demonstration of effectiveness of the PCA.
After validation of the PCA, the team must develop a plan for implementation and clearly communicate this plan with all stakeholders. If the problematic assay was still being performed in-house while the process assessment was being performed, it may be necessary to consider or offer repeat testing on those patient samples with the implemented PCA.
D7: Prevent recurrence
To prevent recurrence of the problem, it’s necessary to perform regular, systematic monitoring after implementation to continually confirm effectiveness of the PCA. It may be that more frequent monitoring is done in the short-term, then after a period of acceptable performance, the laboratory may be reassured that the effectiveness is durable and shift to less frequent monitoring. However, if at any point monitoring indicates that the assay is not performing acceptably, a process improvement assessment may be re-initiated.
Additional changes in the laboratory at this stage include standardizing workflows, updating relevant policies, and sharing the process improvement assessment experience with others in the organization.
D8: Closure and team celebration
The last steps in the 8Ds framework include closure and celebration. This step includes a team debrief and the archiving of the process improvement assessment documents. It is recommended that document templates be used when possible to guide the assessments. A team debrief is important to discuss the process and to identify assessment elements that may be improved next time. Lastly, it’s crucial for team leaders to recognize the contributions of team members and celebrate their success.
Resources
References
- Eight Disciplines of Problem Solving (8D). Quality one. 2021. Retrieved on February 16, 2021 from: https://quality-one.com/8d/#what
- VHA National Center for Patient Safety. 2021. Retrieved on February 16, 2021 from: https://www.patientsafety.va.gov/professionals/index.asp
- National Coordinating Council for Medication Error Reporting and Prevention. 2021. Retrieved on February 16, 2021 from: https://www.nccmerp.org/types-medication-errors
- Heher YK. A brief guide to root cause analysis. Cancer Cytopathol. 2017 Feb;125(2):79-82.
- Heher YK, Chen Y, VanderLaan PA. Pre-analytic error: A significant patient safety risk. Cancer Cytopathol. 2018 Aug;126 Suppl 8:738-744.
- Simon K. The Cause and Effect (A.K.A. Fishbone) Diagram. isixsigma.com. Retrieved on February 16, 2021 from: https://www.isixsigma.com/tools-templates/cause-effect/cause-and-effect-aka-fishbone-diagram/
- Cause Mapping ® Method Investigation File. Downloaded from www.thinkreliability.com. Template version 2020-v1.
Last updated: November 4, 2025
The process improvement assessment will look different in every laboratory, depending on the details of the situation and leadership’s preferences. At minimum, the assessment requires a team approach (IHC laboratory director, technical specialist, lead technologist). It’s recommended that the IHC laboratory develop a form or other tracking document to ensure that actions such as those listed below are performed. Having the document in a shared drive and available to all is helpful to allow team members to update it asynchronously.
Unacceptable responses [step D2] may arise in the pre-analytic, analytic, and/or post-analytic phases. Each of these must be queried in a standard, systematic way [step D4].
- Post-analytic
Double check the slide(s) and documentation (online and paper forms) to confirm that the reported result is the result that was intended to be submitted. - Analytic
- Technical: Review control slide to ensure the correct IHC antibody was run and performed appropriately. Discuss with lead IHC tech and technical specialist. Review in-house QA log. If the laboratory performs antibody dilutions, review the last two to five antibody dilution titer slides prepared upon receipt of new antibody lots to evaluate for a possible staining trend. If the laboratory uses an RTU preparation, review past lot-to-lot comparisons. Review results of prior IHC surveys. Review testing protocol to ensure no errors.
- IHC stain interpretation: Double check for possible pathologist (or in some instances image analysis) error.
- Biologic: No assay has perfect sensitivity and specificity. Antigens may be heterogeneously distributed in tissues.
- Pre-analytic
Double check that PT slides were handled appropriately during storage and preparation prior to analysis. The CAP is generally responsible for guaranteeing absence of pre-analytic variables that would negatively affect a laboratory’s performance on an external quality assessment.
When clerical, pre-analytic, analytic, and post-analytic causes for an unacceptable response have been excluded, the possibility of a biologic explanation for the unacceptable response should be considered. Perhaps the clone has established sensitivity or specificity issues which may only be identified in proficiency challenges which are “low positive” (ie, approach the average laboratory’s limit of detection). CAP IHC Survey Proficiency Summary Reports (PSRs) provide detailed data on clone-specific performance and will highlight platform-specific performance variation if identified in the survey. Similar information is also available from NordiQC assessments which are available online.
When examining an unacceptable result, it’s also helpful to carefully review performance data for all tissue cores included in the survey. Re-reviewing the slides may identify a trend toward over- or under-calling staining quantity and/or staining intensity when compared to the results of other participating laboratories. Evaluating for possible trending will assist the laboratory in defining the scope and significance of the unacceptable result.
Last updated: November 4, 2025
Process Improvement Assessment Examples
- Open all
- Close all
D0: Prepare and plan for the 8D process
The laboratory has intermittent unacceptable responses on ER PT, usually in cases near the 1% positive quantitative threshold. More often, the ER is resulted as negative when the intended response is low positive, but occasionally, ER is resulted as low positive when the intended response is negative. Similarly, in daily case work, there is often intraobserver variability among pathologists regarding ER interpretation. Based on annual monitoring data, the percentage of ER negative breast cancers observed in the laboratory is within published benchmarks (<25-30%). It’s anticipated that the issue is possibly multi-factorial, including pathologist read-out error and/or suboptimal assay conditions (either over- or under-staining).
D1: Form a team
Representatives from stakeholder groups including laboratory staff/supervisor, medical director, breast pathologists, other pathologists resulting ER IHC, breast oncologists.
D2: Describe the problem
The laboratory is experiencing unacceptable responses in ER PT. In most instances, a clear trend in unacceptable responses is not appreciated and pathologists routinely disagree on quantitation.
D3: Interim containment action
Due to ER’s status as a highly-used predictive marker with significant effect on patient care, it would seem prudent to temporarily suspend in-house testing and prioritize time and resources for this process improvement assessment so that a conclusion is reached in less than 10 business days. However, if the delay in TAT due to send-out is unacceptable, in-house testing could be performed with temporary send-out confirmatory testing for any ER low positive or ER negative case (with billing charges removed for the in-house test if send-out is needed).
D4: Root cause analysis (RCA)
- Post-analytic
The TMAs are re-reviewed by a blinded pathologist who did not participate in the initial PT review. Significant disagreement is observed in cases in question. - Analytic
If unacceptable responses fail to show a consistent trend, or if there isn’t a known source of random variation in the laboratory, then this suggests that the observed problem isn’t wholly explained by analytic problems. However, if most of the intended responses trend in one direction, this may indicate that some degree of assay re-optimization would help the situation. After review of the PSR, assay conditions are similar, but not identical, to the majority of laboratories using the same clone/platform. - Pre-analytic
PT slides were handled according to directions upon arrival. No pre-analytic variables were felt to contribute to the problem.
D5: Permanent corrective action (PCA)
In order to determine the PCA, a Pareto diagram was created.
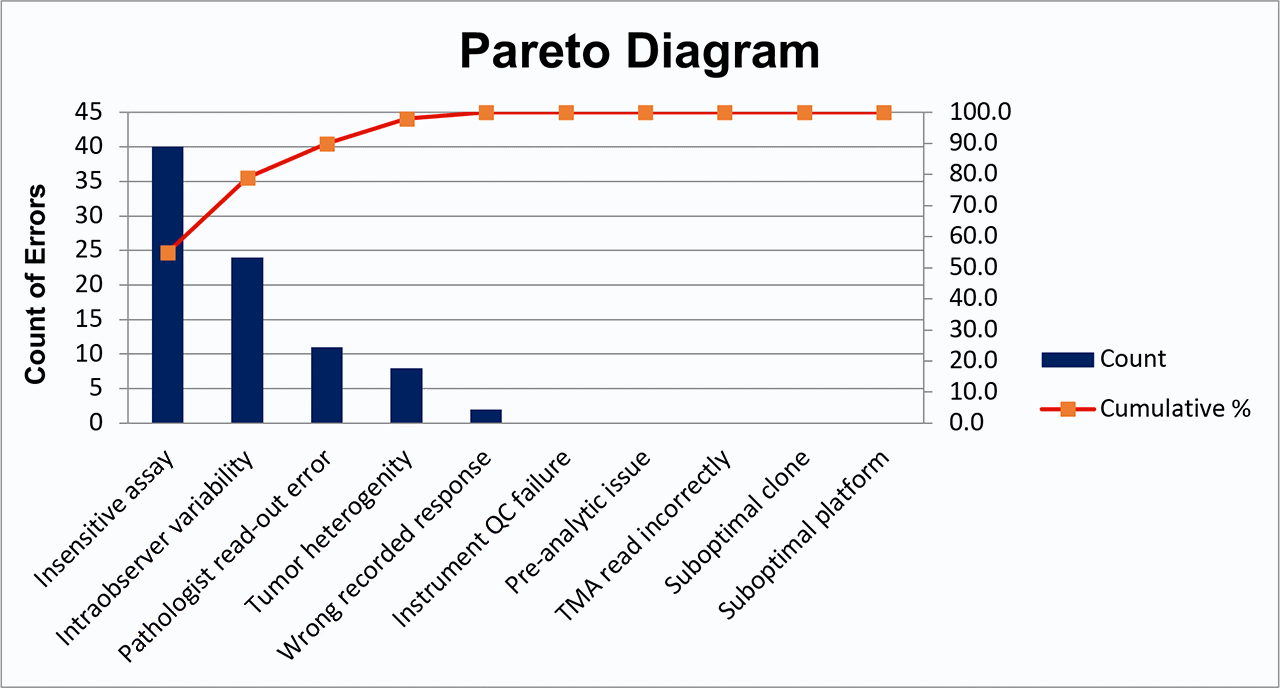
A Pareto diagram is a visual representation of the percent of error assigned to each possible cause. A vertical line is dropped from 80% of the cumulative percent curve to the x-axis. Possible causes to the left of this vertical line account for 80% of the observed error and are considered most important to include in PCA. Possible causes to the right of this vertical line account for fewer than 20% of the observed error and are considered less important at this time.
After reviewing the Pareto diagram, it’s determined that the PCA will be twofold. To address analytic concerns, the assay will be re-validated according to existing recommendations for ER validations, to align assay conditions more closely with those of laboratories using similar clone/platform. To address pathologist intraobserver variability and read-out error, the laboratory will consider digital image analysis.
All pathologists will also be reminded of the 2020 ASCO/CAP ER/PR guideline updates and the instituted laboratory policy for prospective adjudication of ER low positive and ER negative cases. For example, an internal policy is implemented in which any case within or approaching the 1–10% low positive category is shown to a second pathologist before reporting, with any discordance reconciled by a third pathologist.
D6: Implement and validate the permanent corrective action
The revalidated assay will be implemented, and pathologists appropriately use adjudication procedure.
D7: Prevent recurrence
Continued participation in PT. Attention to ER performance monitoring reports. Consider adding ER low positive data to ongoing quality monitoring to observe trends. Consider random sampling of reported ER low positive and ER negative cases for re-review for group educational purposes.
D8: Closure and team celebration
Last updated: November 4, 2025
D0: Prepare and plan for the 8D process
The PR PT failure occurred in the first PT event after the PR assay was re-validated due to clinician generated concern that the observed rate of ER negative/PR positive breast cancer was too high in the patient population. Initially anticipated significant time requirement from the laboratory medical director and laboratory staff to perform revalidation and repeat testing of patient samples since the re-validated protocol was launched.
D1: Form a team
Laboratory medical director, laboratory supervisor, laboratory tech staff, chief of pathology at sites with PT failure, representative breast oncologist (who participated in the initial re-validation).
D2: Describe the problem
Failure to achieve acceptable (90%) concordance with intended responses on a graded proficiency test.

D3: Interim containment action
Initial examination of the unacceptable responses indicated a consistent trend toward false negative results. Since the concern that prompted the initial revalidation was the false positive PR results, it was felt that the potential for false negative would have insignificant impact on immediate patient care. Therefore, testing was allowed to continue in-house for the duration of the PIA. Pathologists and breast oncologists were notified, and plans were made to perform repeat testing on all PR negative cases resulted between launch of the prior re-validated assay and re-launch of the assay following the implementation of the identified corrective action.
D4: Root cause analysis (RCA)
- Post-analytic
The TMA is re-reviewed and submitted responses confirmed to reflect staining on the slide (no clerical errors in response submission). - Analytic
- Assay conditions: Due to the prior assay changes to mitigate clinician concern regarding false positive PR results, the primary antibody incubation time had been recently reduced. In the PIA for that re-validation, a preventive action plan stipulated that if a high rate of potential false negatives were observed, the assay conditions would be further adjusted by making a small increase in primary antibody incubation time, which would align with the manufacturers’ recommendations and the majority of laboratories using the same clone (per the CAP PSR). Antigen retrieval conditions were already aligned with those of other laboratories using the same clone/platform.
- Pathologist read-out: In review of the unacceptable cores, laboratory quarterly monitoring reports for breast predictive markers, and daily cases, it appeared that pathologists were having two issues: 1) difficulty with reproducible quantification at the 1% positive threshold and 2) dismissing weak, nuclear staining as non-specific.
- Biology: Heterogeneity of tumor quantity is a well-established factor that effects standardization in TMA based surveys. The laboratory in question prepares PT materials for interpretation at 4 CLIA licensed sites. By comparing the 4 TMAs after the fact, it was confirmed that there was reasonably consistent staining intensity across the interpreted TMAs, but there was significant variability in the quantity of tumor in slides (affecting denominator and subsequently % positive calculation).
- Pre-analytic
One site observed complete tissue wash-off of one core. Therefore, only 19 responses could be provided and the denominator for calculating concordance rate was reduced. Had this tissue remained on the slide and the reported result was concordant with the intended response, this site would not have achieved <90% concordance. Some degree of tissue wash-off is observed in routine clinical cases in the laboratory. Past PIAs to address this issue specifically have identified high humidity conditions, insufficient or loss of charge of glass slides, and extended or aggressive protocols as causes of tissue wash-off. However, it is not anticipated that these factors contributed significantly in this case due to the controlled pre-analytic conditions of PT materials and not overly aggressive assay conditions. Therefore, the cause of this tissue wash-off remains uncertain. - Conclusion
The root cause is likely multifactorial including both analytic assay concerns and pathologist read-out concerns.
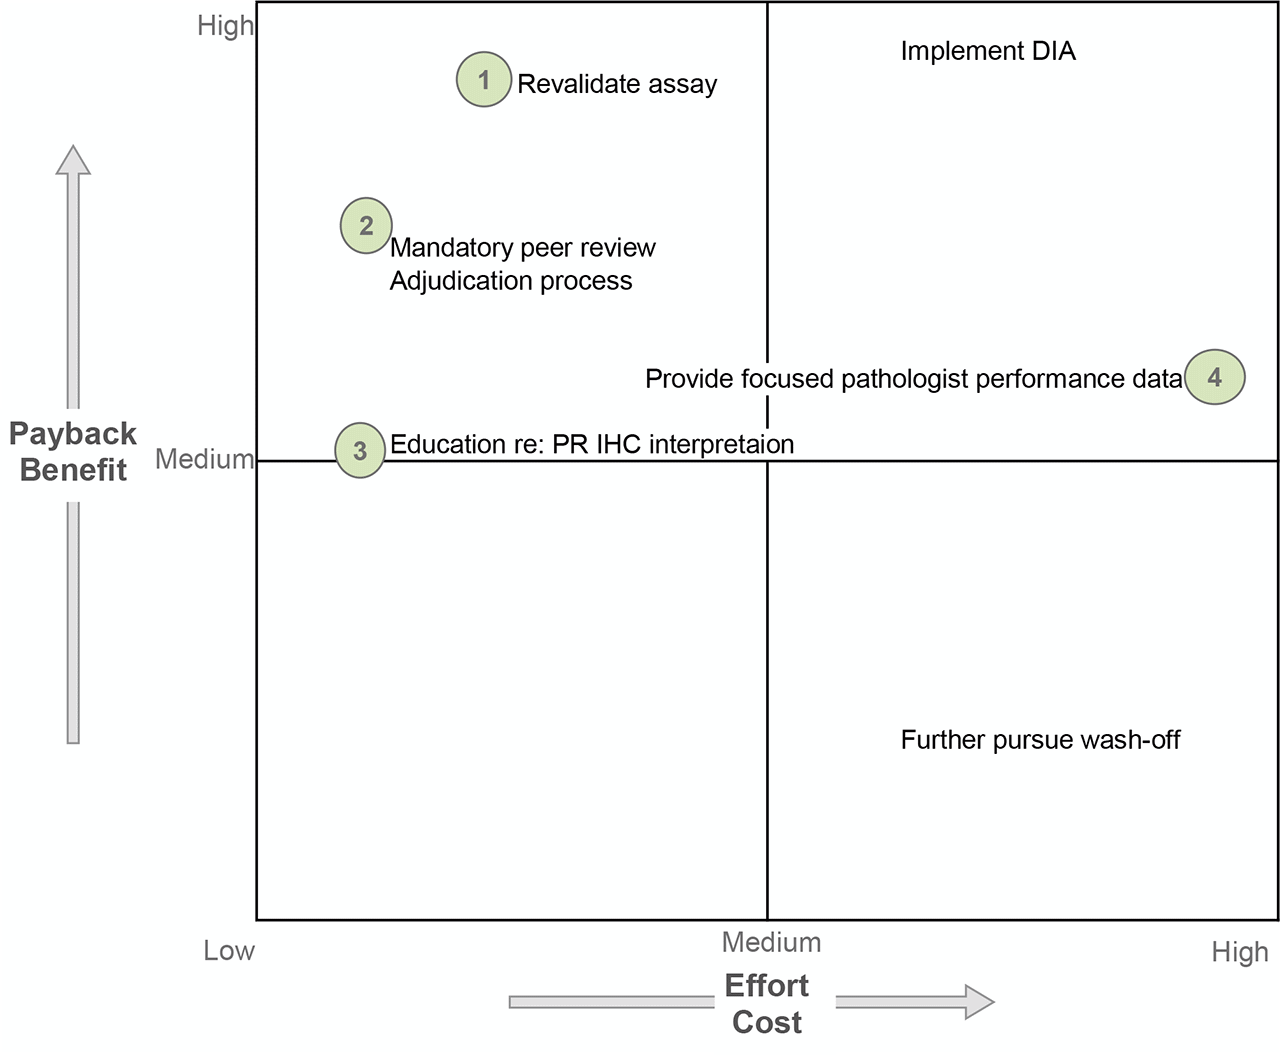
D5: Permanent corrective action (PCA)
Several possible solutions exist to address the assay concerns and pathologist read-out concerns. The time/cost requirements to complete assay revalidation were deemed necessary to produce an assay with acceptable performance so as to continue performing the test in-house (PR is no longer monitored). A mandatory prospective peer review was initiated for all PR negative and PR low positive cases; however, DIA was not further pursued due to high cost and implementation requirements. Pathologist education was performed due to anticipated low time/energy cost but, admittedly, of uncertain yield other than increasing awareness of the need to be conscientious at the 1% threshold and seek other opinions. Finally, site-specific retrospective ER-/PR+ breast cancer data were generated and shared for focused performance evaluation; however, a formal adjudication procedure was not ever defined or implemented.
D6: Implement and validate the permanent corrective action
Primary antibody incubation duration was increased four minutes to align with manufacturer recommendations and the conditions reported by the majority of laboratories using the same clone. A full assay revalidation was performed. The launch of the new assay was announced to breast oncologists. All patient samples with PR negative results since the last assay change were re-tested with the new assay conditions at no charge to the patient.
D7: Prevent recurrence
Breast predictive marker quality monitoring was expanded to include site-specific data for ER-/PR+ breast cancer. As a result of cumulative assay changes, a compensatory increase in triple negative and ER+/PR- breast cancer was anticipated, and these metrics were included accordingly. The laboratory continues to participate in PT. The internal process for annual pathologist competency assessment, as required for breast predictive markers, was to be re-evaluated.
D8: Closure and team celebration
Monitoring of site-specific ER-/PR+ breast cancer was planned to continue for 12 months. If at that time, the rate of ER-/PR+ breast cancer was stable at <2% and there were no clinician concerns, the corrective action plan would be closed. If not, the laboratory would re-evaluate.
Last updated: November 4, 2025
D0: Prepare and plan for the 8D process
The laboratory achieves unacceptable concordance with intended responses on ALK PT. Initially anticipate an analytic issue with the assay and allocate several hours of laboratory tech and laboratory director time to troubleshoot the assay.
D1: Form a team
Laboratory tech/laboratory supervisor, medical director.
D2: Describe the problem
The laboratory achieved acceptable results on six of 10 cores. The laboratory registered unacceptable results on four of 10 cores—in all unacceptable cores, the intended response was positive, and the laboratory’s submitted response was negative. This suggested insufficient assay sensitivity. A team member suggests creating a Fishbone diagram to consider whether there may be alternative or additional causes of the unacceptable PT performance.
D3: Interim containment action
Due to the high rate of false negative results, and because a negative result has the significant effect of excluding a patient from receiving therapy, the laboratory will temporarily cease in-house predictive ALK IHC and perform as a send-out.
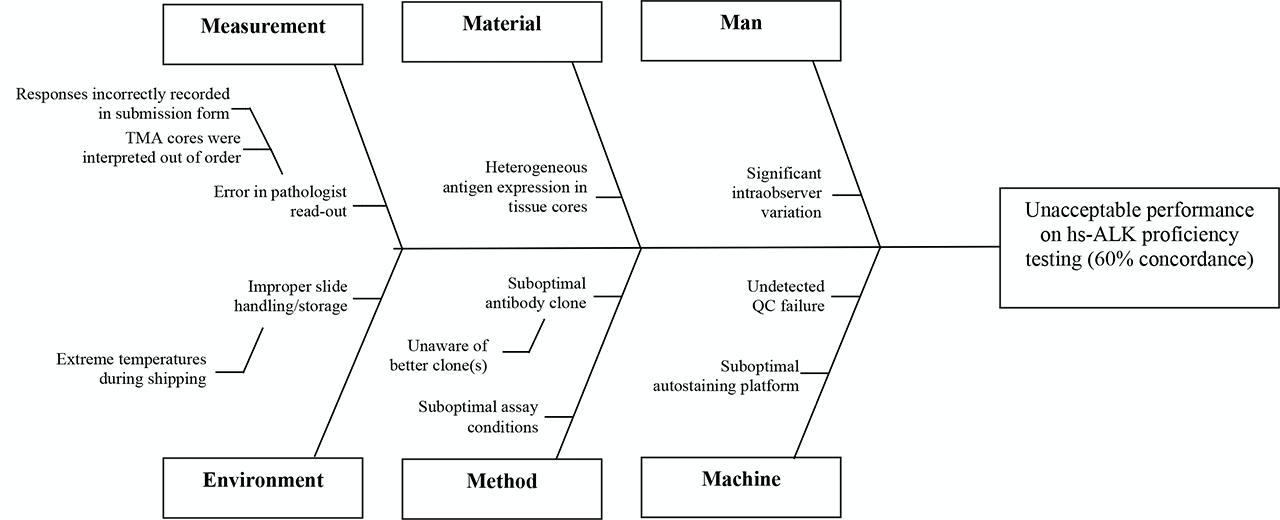
D4: Root cause analysis (RCA)
- Post-analytic
The TMA is re-reviewed and the responses confirmed to reflect staining on the slide (no clerical errors). - Analytic
The PSR from the past ALK survey is reviewed for comparison of assay parameters with other laboratories. It’s noted that the majority of laboratories use highly sensitive ALK clones, and that other labs observing negative results on the four cores in question were predominately also using ALK1 (not a highly-sensitive ALK clone). - Pre-analytic
PT slides were handled according to directions upon arrival. No pre-analytic variables felt to contribute to the problem. - Conclusion
The root cause of the problem is use of an insufficiently sensitive clone.
D5: Permanent corrective action (PCA)
Based on additional literature review, comparison with other laboratories via the PSR, and review of recommendations to perform predictive ALK testing using highly sensitive clones, the laboratory will change to a highly sensitive ALK clone. Alternatively, re-optimization of the assay using ALK1 was considered; however, available literature suggests that assay parameters that produce acceptable concordance with ALK rearrangement have not been identified for ALK1.
D6: Implement and validate the permanent corrective action
New clone requires full revalidation using 20 positive and 20 negative cases. The comparator method will be results of ALK FISH and/or molecular. Clinicians, especially pulmonary oncologists, will be notified of the RCA and offered the opportunity to perform repeat testing using the highly sensitive clone at no cost to patients.
D7: Prevent recurrence
ALK1 is still felt to be a diagnostically-relevant immunostain that should be retained on the test menu. There’s potential for confusion and inappropriate ordering if there are two “ALK stains” in the IHC menu. The order for highly sensitive ALK will be specified by clone name (HSALK). Periodic monitoring of highly sensitive ALK results will be performed to confirm that ~5% of lung cancers are positive by highly sensitive ALK immunohistochemistry. An automated reminder will be set up to prompt at least annual literature review regarding the availability and performance of new highly sensitive ALK clones.
D8: Closure and team celebration
Additional comments:
The IHC committee has observed, in past highly sensitive ALK proficiency testing, that up to 15% of participants continue to use ALK1 instead of highly-sensitive ALK clones.
Last updated: November 4, 2025
D0: Prepare and plan for the 8D process
The laboratory has intermittent unacceptable responses on BRAF V600E Pt. Unacceptable responses are usually cases where the intended response was positive, and the submitted response was negative. Anticipate missing low positive cases requiring assay re-optimization and revalidation. Anticipate allocating several hours of laboratory staff and medical director time for process improvement assessment and resolution.
D1: Form a team
Laboratory tech/supervisor, medical director, possibly staff in molecular genetics who can provide confirmed V600E mutation cases.
D2: Describe the problem
Over the last several rounds of BRAF V600E PT, the laboratory has had intermittent false negative results, indicating insufficient assay sensitivity.
D3: Interim containment action
Although a problem requiring resolution, the frequency of false negative results seems low level. The interim plan will be to continue in-house testing but perform confirmatory molecular analysis for all BRAF V600E IHC negative results.
D4: Root cause analysis (RCA)
- Post-analytic
The TMA is re-reviewed by those pathologists in the group most experienced at interpretation of BRAF V600E IHC; the submitted responses are confirmed to reflect staining on the slide (no clerical errors and interpreted correctly). - Analytic
The PSR from past BRAF V600E surveys is reviewed for comparison of assay parameters with other laboratories—it’s noted that most laboratories using the same clone/platform use a longer primary antibody incubation duration and more aggressive antigen retrieval. Past lot-to-lot comparisons are retrieved and reviewed; there’s been no decrement in staining over time. The original BRAF V600E validation documentation is retrieved and reviewed, showing strongly positive staining in all positive cases. On-slide positive control tissue selected from the positive validation cases is strongly positive. - Pre-analytic
PT slides were handled according to directions upon arrival. No pre-analytic variables felt to contribute to the problem. - Conclusion
The root cause of the problem is likely suboptimal assay conditions. Absence of low positive cases from the validation cohort and on-slide control tissue likely contributed to a suboptimal initial validation.
D5: Permanent corrective action (PCA)
Re-optimize and revalidate the assay.
D6: Implement and validate the permanent corrective action
Assay to be revalidated using a longer antibody incubation duration (or other parameters). A larger number of cases will be included in the validation cohort to characterize the spectrum of positivity in cases, including low positivity cases. A low positive case will be identified and used as the on-slide positive control tissue.
D7: Prevent recurrence
Continued participation in PT and attention to fluctuations in the low positive control. Could consider molecular testing of a random sample of IHC negative cases, to confirm no recurrent issue with false negatives.
D8: Closure and team celebration
Additional comments:
Review of CAP PT survey data for BRAF V600E collected in recent years indicates that most “unacceptable” results occurred in assessment of BRAF V600E status in colonic adenocarcinoma samples. It’s been speculated that a lower level of mutant protein expression in these tumors compared to others, such as melanoma, may be the underlying issue. If a laboratory used only melanoma tissue in the assay validation process, it may select a staining condition that is optimized for detecting abundant mutant protein in melanoma, which may be insufficiently sensitive for reliable detection of mutant protein in colonic adenocarcinoma. Therefore, validation of the staining protocol has to be performed using all tumor types for the intended clinical applications. Correct interpretation of staining results may also be challenging for some colonic adenocarcinoma samples and orthogonal testing methods should be considered in challenging cases.
Last updated: November 4, 2025
My laboratory has intermittent unacceptable performance for our KIT proficiency testing (PT) survey.
D0: Prepare and plan for the 8D process
The laboratory has experienced intermittent unacceptable responses on KIT PT. The majority of the unacceptable responses occurred where the intended response was negative, and the submitted response was positive. Appropriate KIT staining is localized to the cytoplasm. Most of the unacceptable responses demonstrated nuclear staining. Based on this preliminary review of the data, the laboratory leadership anticipates the cause of nuclear staining is due to extended or overly aggressive assay conditions. Laboratory leadership anticipates allocating several hours of laboratory staff and medical director time for process improvement assessment and resolution.
D1: Form a team
Laboratory staff/supervisor, medical director
D2: Describe the problem:
The laboratory is experiencing unacceptable responses in KIT PT. In most instances, the intended result is negative, and the laboratory has submitted a result of positive, indicating insufficient specificity.
D3: Interim containment action
Although KIT is a diagnostically useful marker in some situations, it serves a limited role as a predictive marker. Diagnostically, there are alternative markers to KIT testing available in the laboratory (DOG1 in GIST; CD34 or MPO in AML); as such there is limited potential for negative adverse effect on patient care. Will notify pathologists of the concern for potential over-staining and temporarily recommend against use of the in-house stain while process improvement assessment is on-going.
D4: Root cause analysis (RCA)
- Post-analytic
The TMA is re-reviewed and submitted responses confirmed to reflect staining on the slide (no clerical errors). - Analytic
The PSR from the past KIT survey is reviewed for comparison of assay parameters with other laboratories. It’s noted that most laboratories use assay parameters that are less aggressive or of shorter duration than what’s is currently used in the lab. - Pre-analytic
PT slides were handled according to directions upon arrival. No pre-analytic variables felt to contribute to the problem. - Conclusion
The root cause of the problem is likely overly aggressive or extended assay conditions.
D5: Permanent corrective action (PCA)
Assay to be reoptimized; considering using shorter antibody incubation duration, less aggressive antigen retrieval conditions, omitting additional heat options, etc. Conditions will be titrated until nuclear staining is not observed.
D6: Implement and validate the permanent corrective action
The reoptimized and revalidated protocol will be implemented. At that time, pathologists will be notified of the change in assay parameters and the recommendation against performing in-house testing will end.
D7: Prevent recurrence
Continued participation in PT and attention to fluctuations in control tissue. Return of nuclear staining would require another process improvement assessment.
D8: Closure and team celebration
Last updated: November 4, 2025